Wednesday, November 21, 2012

Serai@ Shaftsbury Square,Cyberjaya

This shop has been having the "now open' sign for the past few weeks. Unsure of whether it was actually open or not, the 3 of decided to give it a go. Very glad to know that Serai has finally opened its doors to the Cyberjaya Folks


The setting and the pricing of this shop is somewhat between Ben's and Delicious. But paying that hefty price for lunch was definitely worth it because the food we ordered turned out to be really good.

We decided to order sirap selasih and Serai Iced Tea. The sirap wasnt too sweet and came with a good amount of the biji selasih. The ice tea came with a  scoop of lime ice lolly(reminds me to make more ice lollies for this Mickeyface visit this weekend) and handful of mint leaves. It tasted like a virgin mojito.
Sirap selasih RM7 and Serai Ice Tea RM12
The H tried Nasi Goreng Kampung. It arrived on a plate with strips of keropok ikan, and 2 sticks of chicken satay. The satay sauce was made with freshly ground peanuts and satay sticks had more meat than fat(wish the same could be said for our local Kajang satay).
Nasi Goreng Kampung RM15
The WHY took Sang Har Yin Yong. The bowl was in the shape of a cowboy hat but only that was the most interesting of this dish. It tasted wuite normal, really.
Sang Har Yin Yong RM19
I decided on the Spicy Thai Rice. Reminded me of my college days when i used to have the spicy Thai rice sold by a Thai national at the Kota raya food court. Dingy and dark, the foodcourt was always packed with students and foreign workers alike but the food was excellent. I have never had such good Thai rice till today and am glad to have ordered this dish.
Spicy Thai Rice RM15
Serai is probably gonna be our favourite restaurant in Shaftsbury now, coming second to the Korean Food

www.seraigroup.com.my

Wednesday, October 17, 2012

Vegetarian Burgers


One carrot
A couple of beans
Peas
A small bunch of Cilantro leaves
1 tsp of garam masala
1 tsp of chat masala or mango powder
½ tsp of cumin powder
½ tsp of paprika or chili powder
Crumbs of 1 bread
Salt to taste
A pinch of sugar

1.       Boil the potatoes, carrot,beans and peas until soft. Mash them all together in a food processor and add the other items
2.       Break the ‘dough’ into equal balls and press them down to flatten them
3.       Lightly fry the patty for about a minute on each side
4.       Serve with a side dish of salad and fried purple sweet potatoes

Note: You can make the patties thinner or thicker according to your preference. As they are vegan patties they can be quite soft, so you can either fry them on  a flat pan or deep fry them for a more even crisp.

Thursday, March 1, 2012

Raspberry Ice Lollies

I just love the Lolly Maker I have. Its so easy to just squeeze out juice from fruits and freeze it overnight and Voila! Healthy treat for everyone ..great for weight watchers too..


So this is one of the recipes i tried. Raspberries are a little expensive in this country but it was worth the money.
My most favourite is still the lychee lollies, if you cant get them fresh, just blend the canned lychees, add a little of the syrup and have a great time...!


Makes: 6-8 depending on size of the lolly mould
Preparation time: 10 minutes, plus overnight freezing time

You will need
300g raspberries
1 tbsp icing sugar
200ml can evaporated milk

Method
1.Put the raspberries in a blender with the icing sugar and mix together. Add the evaporated milk and mix until smooth.
2.Sieve the mixture into a jug and discard the pips then pour into sections of a lolly mould. Add the sticks or lids and freeze overnight until firm.
3.Run the mould under hot water to loosen the lollies then take out of moulds. Serve immediately

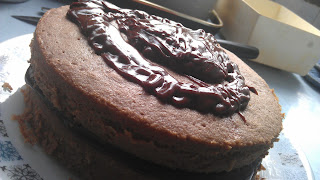
OLD FASHIONED CHOCOLATE CAKE

This is one of the most simplest and yummiest cake Diplodocus and I have tried out. A little warning though,the chocolate can get a bit much according to the recipe below, which I got of one of Nigella's cookbooks. So maybe in the future I would make a little less glaze...a little can go alooong way.. :)

For chocolate lovers! 

Ingredients
FOR THE CAKE:
·    200g plain flour
·    200g caster sugar
·    1 teaspoon baking powder
·    1/2 teaspoon bicarbonate of soda
·    40g best-quality cocoa
·    175g soft unsalted butter
·    2 large eggs
·    2 teaspoons real vanilla extract
·    150ml sour cream
FOR THE ICING:
·    75g unsalted butter
·    175g best quality dark chocolate, broken into small pieces
·    300g icing sugar
·    125ml sour cream
·    1 teaspoon real vanilla extract
Serves: Makes about 8 slices
1.   Preheat the oven to 180°C and line and butter two 20cm sandwich tins with removable bases(if you have them). For this recipe, I did not have the sandwich tins and hence baked the cakes 2 times using one regular tin
2.  Now all you have to do is put all the cake ingredients - flour, sugar, baking powder and bicarb, cocoa, butter, eggs, vanilla and sour cream - into a food processor and process until you have a smooth, thick batter. If you want to go the long way around, just mix the flour, sugar and leavening agents in a large bowl and beat in the soft butter until you have a combined and creamy mixture. Now whisk together the cocoa, sour cream, vanilla and eggs and beat this into your bowl of mixture.
3.  Divide this batter, using a rubber spatula to help you scrape and spread, into the prepared tins and bake until a cake tester, or a thin skewer, comes out clean, which should be about 35 minutes, but it is wise to start checking at 25. Also, it might make sense to switch the two cakes around in the oven halfway through cooking time.
4.  Remove the cakes, in their tins, to a wire rack and let cool for 10 minutes before turning out of their tins. Don't worry about any cracks as they will easily be covered by the icing later.
5.   To make this icing, melt the butter and chocolate in a good-sized bowl either in the microwave or suspended over a pan of simmering water. Go slowly either way: you don't want any burning or seizing.
6.  While the chocolate and butter are cooling a little, sieve the icing sugar into another bowl. Or, easier still, put the icing sugar into the food processor and blitz. This is by far and away the least tedious way of removing lumps.
7.   Add the the sour cream and vanilla and then when all this is combined whisk in the sieved icing sugar. Or just pour this mixture down the funnel of the food processor on to the icing sugar, with the motor running.
8.  When you've done, you may need to add a little boiling water - say a teaspoon or so - or indeed some more icing sugar: it depends on whether you need the icing to be runnier or thicker; or indeed it may be right as it is. It should be liquid enough to coat easily, but thick enough not to drip off.
9.  Choose your cake stand or plate and cut out four strips of baking parchment to form a square outline on it (this stops the icing running on to the plate). Then sit one of the cakes, uppermost (ie slightly domed) side down.
10.     Spoon about a third of the icing on to the centre of the cake half and spread with a knife or spatula until you cover the top of it evenly. Sit the other cake on top, normal way up, pressing gently to sandwich the two together.
11. Spoon another third of the icing on to the top of the cake and spread it in a swirly, textured way (though you can go for a smooth finish if you prefer, and have the patience). Spread the sides of the cake with the remaining icing and leave a few minutes till set.


Monday, February 13, 2012

Hummingbirds Coffee Bar

It was a relieve to get out of the sun and into Hummingbird's cool and comfortable setting.


I had read about Hummingbirds on some other blogs before and after a persuasive recommendation from the G, i decided to drag the diplodocus and pay this coffee bar a visit.

Situated on the same row as Alexis Bistro, the shoplot is combined with Beatrice Looi's Boutique and Tailoring. The set up reminds one of being in a coffee bar somewhere off the Siene. Not to say i have been to Siene, but i guess its what it would look like. Thank you Hollywood!


Anyways, I decided to try the red velvet cake, which was jus out of the oven when we arrived and was sitting on the counter awaiting the cheese frosting. The cake was soft and not very sweet though it had a little too much flour.

Diplodocus decided to go with the rainbow cake, and though it looked very tempting(and magical!) the cake was too dense for her taste. It was also a lot sweeter than the red velvet.


We had iced chocolate and the summer breeze respectively. Nothing much to shout about on the chocolate, but the summer breeze made of lemon and cucumbers was a real cooler on such a hot day.
 

I do not know if I could recommend this place to friends but for a nice afternoon tea and to have a comfortable spot to hang out with the Toads and Big Sis, I wouldn’t mind visiting it again.

Hummingbirds Coffee Bar,
Beatrice Looi Boutique,
Jalan Telawi 3, Bangsar.